In the world of DIY projects, construction, and home improvement, knowing how to use a tape to measure accurately is crucial. Whether you’re hanging a picture frame, building furniture, or measuring for new appliances, knowing how to read a tape measure is an essential skill.
This comprehensive guide will walk you through everything you need to know about using a measuring tape, from understanding its components to avoiding common mistakes.
Understanding Your Tape to Measure
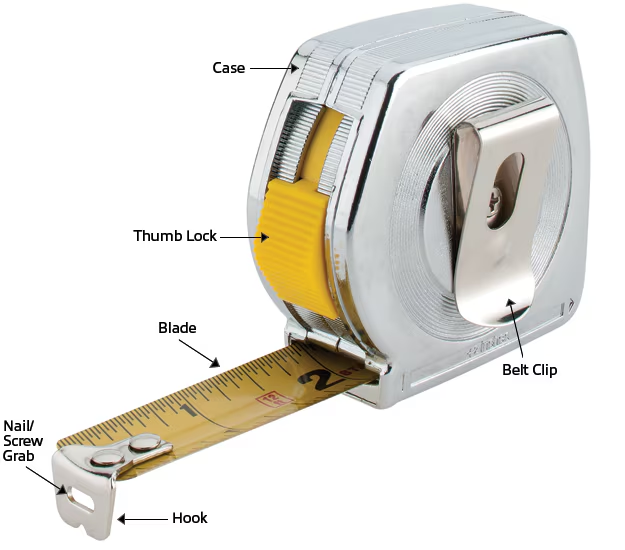
Before we dive into reading measurements, let’s familiarize ourselves with the parts of a tape measure:
- The Case: Typically made of plastic or metal, it houses the blade and other components. The case is designed to withstand the rigors of job sites and frequent use.
- The Blade: The extendable, marked strip used for measuring. Blades are usually made of steel or fiberglass and coated with a protective layer to resist wear and tear. Some specialized versions, like a cloth tape measure, are designed for flexibility.
- The Hook: The metal tab at the end of the blade, crucial for accurate measurements. Its loose rivet allows for both inside and outside measurements.
- Locking Mechanism: Keeps the blade extended at a specific length. This feature is essential for solo measurements and precise marking.
- Belt Clip: Allows for easy carrying and access. A sturdy clip ensures the tape measure stays secure when not in use. Some professionals prefer a tape measure belt holder for quick access.
- Spring Mechanism: Enables the blade to retract smoothly into the case. The quality of this mechanism often determines the longevity of the tape measure.
“A good tape measure is like a trusty sidekick in any DIY or professional project.” – Bob Vila, home improvement expert
For specialized needs, there are various types of tape measures available:
- Extending measuring tape: Ideal for longer distances
- Mini tape measure: Perfect for carrying in a pocket or small toolbox
- Fishing tape measure: Designed for anglers to measure their catch
- Engineers tape measure: Built for precision in engineering projects
The Importance of the Hook (tape measure)
The hook on a tape measure serves two crucial functions:
- For outside measurements, it provides a grip point.
- For inside measurements, it moves slightly to account for its own thickness.
This movement, typically 1/16 of an inch, ensures accuracy whether you’re measuring from the outside in or the inside out. This clever design feature is known as “true zero” and is crucial for precise measurements in both carpentry and construction.
Understanding Measurement Systems
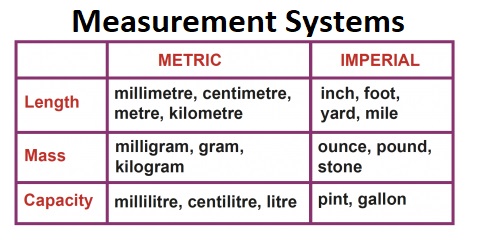
Most tape measures feature two measurement systems: Imperial and Metric. Understanding both systems is crucial for versatility in various projects and international collaborations.
Imperial System (Inches and Feet)
The Imperial system is commonly used in the United States. On a tape measure, you’ll see:
- Feet marked by bold numbers and long lines
- Inches marked by shorter lines between foot markers
- Fractions of an inch represented by progressively shorter lines
Here’s a detailed breakdown of imperial markings:
| Fraction | Line Length | Typical Use |
|---|---|---|
| 1/2 inch | Medium | Rough carpentry |
| 1/4 inch | Short | General woodworking |
| 1/8 inch | Shorter | Precise woodworking |
| 3/16 inch | Between 1/4 and 1/8 | Specialized applications |
| 1/16 inch | Shortest | Fine carpentry, metalwork |
Some specialized tape measures even include 1/32 inch markings for extremely precise work. Tape measures with fractions clearly labeled can be particularly helpful for those new to measurement.
Metric System (Centimeters and Meters)
The Metric system is used globally and is based on units of 10. On a metric tape measure, you’ll see:
- Centimeters marked by numbered lines
- Millimeters represented by smaller lines between centimeter marks
The metric system’s simplicity lies in its decimal nature:
- 10 millimeters = 1 centimeter
- 100 centimeters = 1 meter
Pro Tip: Some tape measures have metric measurements on one side and imperial on the other. Always check which side you’re using to avoid measurement errors!
Decoding Tape Measure Markings
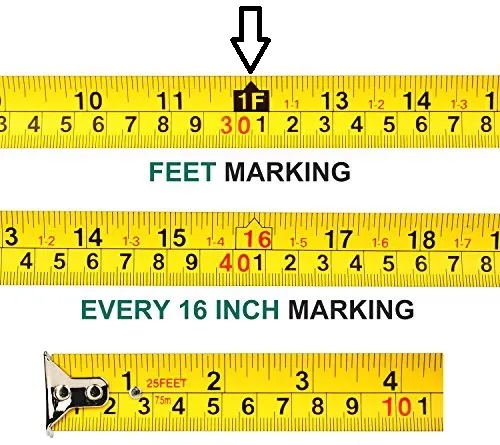
Understanding the markings on your tape measure is key to accurate measurements. Let’s break it down:
Foot Markers
On an imperial tape measure, every 12 inches is typically marked with a larger number and a different color (often red). This represents one foot. These bold markings make it easy to quickly measure larger distances.
Inch Markers
Between foot markers, you’ll find inch markers. These are usually the second-longest lines on the tape, numbered from 1 to 11. Each inch is further divided into smaller fractions.
Fractional Inch Markers
Between each inch, you’ll see progressively shorter lines representing fractions of an inch:
- 1/2 inch: Midway between inch marks
- 1/4 inch: Halfway between 1/2 inch marks
- 1/8 inch: Halfway between 1/4 inch marks
- 1/16 inch: The smallest marks on most standard tape measures
Understanding these fractions is crucial for precise woodworking and carpentry projects.
Whether you’re hanging a picture frame or measuring furniture, a tape to measure is an essential tool in your toolkit.
tape measure Special Markings
Many tape measures include additional markings for specific purposes:
- Diamond marks: Often at 19.2-inch intervals, used for spacing studs in construction. This spacing allows for more efficient use of building materials.
- Red numbers: Typically at 16-inch intervals, used for marking truss layouts and standard stud spacing in North American construction.
- Black diamonds: Found at 19.2-inch intervals, these are used for engineered wood spacing in floor joists and roof trusses.
Understanding these special markings can significantly speed up construction and framing tasks.
For those struggling with fractional measurements, a read a tape measure worksheet can be an invaluable learning tool. These worksheets provide practice exercises and visual aids to help you master the skill of reading a tape measure.
Mastering the Tape to Measure for Accurate Readings
Now that we understand the components and markings, let’s walk through the process of reading a tape measure:
- Extend the blade: Pull out the blade to the desired length. Ensure it’s straight and taut for accuracy.
- Align the hook: Ensure the hook is properly positioned against the edge of what you’re measuring. For outside measurements, the hook should grip the edge. For inside measurements, push the hook against the surface.
- Lock the blade: Use the locking mechanism to keep the blade steady. This is particularly useful when working alone or in windy conditions.
- Read the measurement:
- Start with the largest unit (feet or meters)
- Move to the next largest unit (inches or centimeters)
- Finally, read the smallest unit (fractions of an inch or millimeters)
Example: Reading 5 Feet, 3 and 5/8 Inches
- Locate the 5-foot mark (usually a red number)
- Count 3 full inch marks after the 5-foot mark
- Find the 5/8 mark (it’s the fifth shortest line after the 3-inch mark)
This measurement would be written as 5′ 3-5/8″ in construction notation.
Practice Exercise: Try measuring various objects around your home, like a king size bed or plywood sheets, to get comfortable with reading different measurements. A standard king size bed is typically 76 inches wide by 80 inches long, which translates to 6 feet 4 inches by 6 feet 8 inches.
Advanced Techniques and Tips (tape measure)
Once you’ve mastered the basics, these advanced techniques will help you become a tape measure pro:
Using the Sliding Hook
The sliding hook is designed to provide accurate measurements for both inside and outside dimensions:
- For outside measurements, pull the hook outward
- For inside measurements, push the hook inward
The hook typically moves about 1/16 of an inch, which is the thickness of the hook itself. This clever design ensures accuracy in both scenarios.
Measuring Curves and Circles
To measure curves:
- Use a flexible tape measure or a string
- Follow the curve closely
- Mark the end point
- Measure the string with your standard tape measure
For circles, measure the diameter (straight across the center) and use the formula: Circumference = Diameter × π (approximately 3.14159)
For more precise circular measurements, you can use a specialized diameter tape that reads the circumference directly.
Utilizing the Case Dimensions
Many tape measure cases have their length printed on them, typically 3 inches. Use this for quick, small measurements or in tight spaces. Some cases also have small indentations or markings that can be used for scoring or marking materials.
Reading Fractions on a Tape Measure
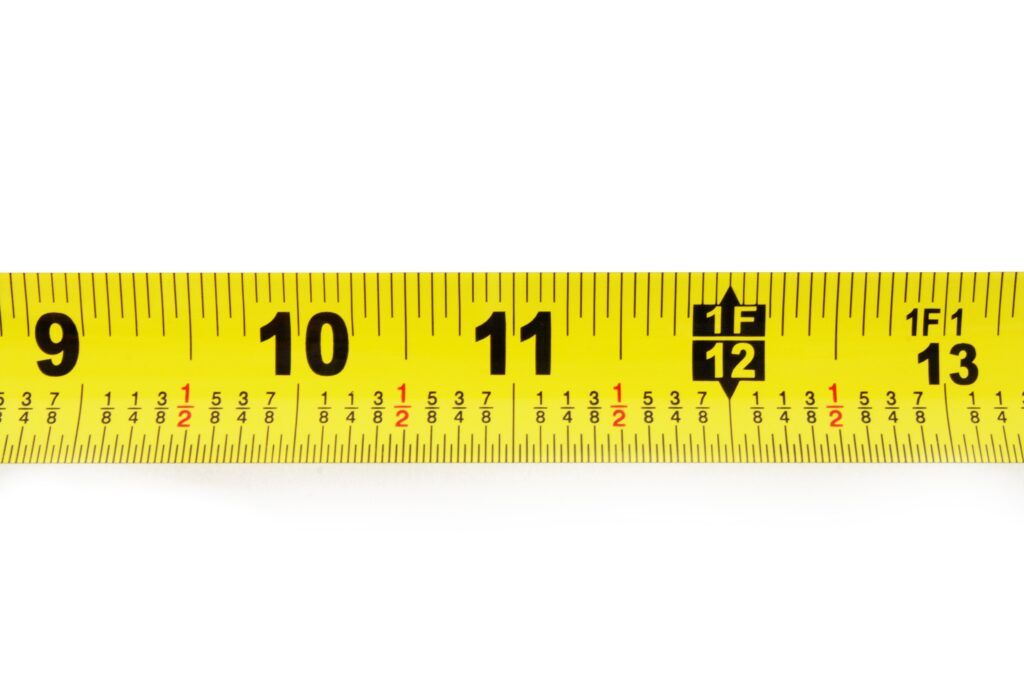
For those new to fractions, here’s a quick guide:
- The space between each inch is divided into 16 equal parts
- Each mark represents 1/16 of an inch
- Two marks = 1/8 inch, four marks = 1/4 inch, and eight marks = 1/2 inch
Practice identifying these fractions to speed up your measuring process. In many DIY and construction projects, knowing how to read a tape measure with fractions is a crucial skill. The blade of a typical tape measure is marked with both imperial and metric measurements, with fractions clearly indicated for precision work. Understanding these fractions — like 1/2, 1/4, and 1/16 of an inch — allows you to measure accurately, whether you’re building furniture, installing cabinets, or tackling home renovations.
A tape measure with fractions is especially useful for woodworking, where even slight inaccuracies can lead to project flaws. The hook at the end of the tape moves slightly to account for inside and outside measurements, ensuring that you achieve the exact dimensions. This movement, known as the “true zero,” compensates for the thickness of the hook, so both interior and exterior measurements are precise.
Using Long Tape Measures
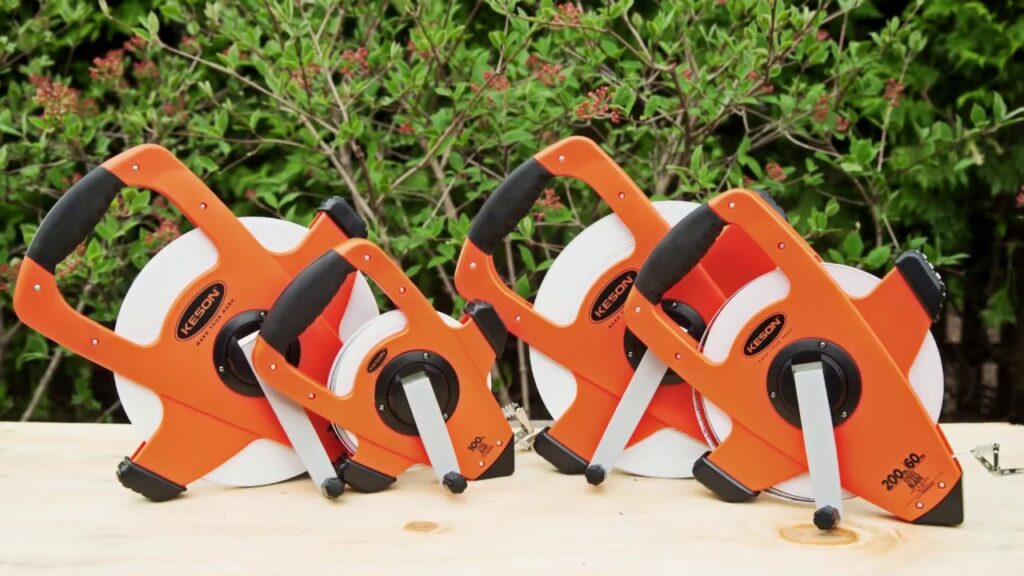
For large-scale projects, a 100-foot tape measure or an engineering tape measure might be necessary. These long tape measures require special techniques:
- Use a helper to hold the other end for accuracy
- Be aware of sag in the middle and compensate accordingly
- Consider using a laser measure for very long distances
Measuring Soft Materials

When working with fabrics or measuring for clothing, a flexible measuring tape or clothes measure tape is essential. These soft, pliable tape measures conform to curves and body contours, making them ideal for:
- Taking body measurements for tailoring
- Measuring for curtains or other soft furnishings
- Crafting projects involving fabric or flexible materials
Digital Tape Measures: A Modern Alternative
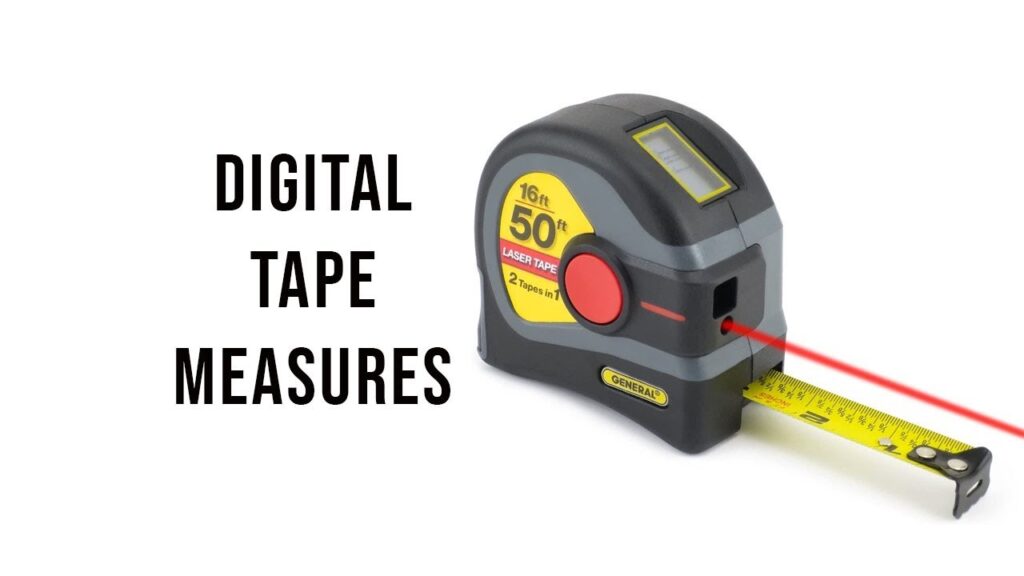
While traditional tape measures are still widely used, digital versions offer some advantages:
- Automatic conversion between imperial and metric units
- Memory function to store multiple measurements
- Backlit displays for low light conditions
- Precision to 1/100 of an inch or 0.1 mm
However, they also have drawbacks:
- Reliance on batteries
- Potentially less durable than traditional tape measures
- Higher cost
- May be affected by extreme temperatures or magnetic fields
When choosing between digital and traditional tape measures, consider your specific needs and working conditions.
Common Mistakes and How to Avoid Them
Even experienced DIYers can make measurement mistakes. Here are some common pitfalls and how to avoid them:
- Misreading fractions: Always double-check your reading of the smaller lines. If in doubt, use a fraction calculator or conversion chart.
- Misreading specific fractions: Pay special attention to fractions like 5/8 on a tape measure or 3/4 measuring tape marks. These can be easily confused with nearby fractions if you’re not careful.
- Forgetting the tape measure case: Remember to account for the case’s length in inside measurements. Most cases are about 3 inches long.
- Incorrect tension: Too much slack can lead to inaccurate measurements. Keep the blade straight and taut. For long measurements, have someone help you hold the tape or use a support.
- Mixing up imperial and metric: Always confirm which system you’re using before starting. Some projects may require converting between systems, so keep a conversion chart handy.
- Ignoring the hook movement: Remember that the hook is designed to move. Ensure it’s properly positioned for inside or outside measurements.
- Not accounting for the blade width: When measuring inside corners, add the width of the tape blade to your measurement for accuracy.
“Measure twice, cut once. This old carpenter’s adage can save you time, money, and frustration.” – Unknown
Maintaining Your Tape Measure
Proper maintenance ensures your tape measure remains accurate and functional:
- Clean the blade regularly with a damp cloth to remove dirt and debris
- Store in a dry place to prevent rust and corrosion
- Check for accuracy periodically by comparing it to a known measurement or another tape measure
- Replace the blade if it becomes damaged or worn. Many high-quality tape measures have replaceable blades
- Lubricate the spring mechanism occasionally with silicone spray for smooth retraction
- Inspect the hook regularly for looseness or damage. A damaged hook can lead to inaccurate measurements
Specialized Tape Measures for Different Industries
While standard tape measures work for most situations, some industries have specialized versions:
- Construction: Heavy-duty tape measures with extended length (up to 100 feet) and reinforced blades for durability
- Sewing: Flexible, non-stretching tape measures for body measurements and fabric work
- Surveying: Long, durable tape measures for outdoor use, often with additional markings for land measurement
- Forestry: Diameter tapes that measure tree circumference and convert it to diameter readings
- Medical: Disposable paper tape measures for hygienic body measurements
- Fashion and Tailoring: Cloth tape measures are essential for taking body measurements and working with fabrics.
- Engineering: Engineering tape measures often include additional markings and scales for precise calculations.
- Custom Applications: Some companies offer custom tape measures with specialized markings or branding for specific industries or promotional purposes.
Each of these specialized tape measures is designed to meet the unique needs of its industry, demonstrating the versatility and importance of accurate measurement across various fields.
Practical Applications and Projects (tape measure)
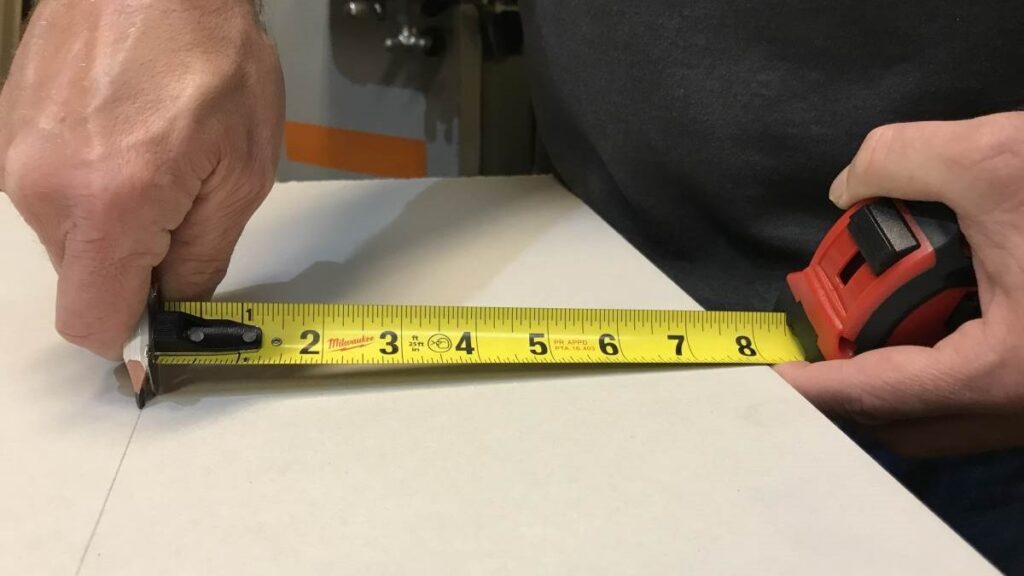
Now that you’re comfortable reading a tape measure, here are some projects to practice your skills:
- Measuring for furniture: Ensure new pieces fit in your space. Remember to account for doorways and staircases when bringing in large items.
- Hanging artwork: Precisely place picture frames. Use the level built into some tape measures for perfect horizontal alignment.
- DIY home improvements: From painting to flooring installation. Calculate paint or flooring materials needed by measuring room dimensions.
- Woodworking: Create custom pieces with exact measurements. Practice reading to the nearest 1/16 inch for fine woodworking projects.
- Gardening: Measure plant spacing and bed dimensions for optimal growth and design.
- Fitness tracking: Use a tape measure to track body measurements as part of a fitness regime.
- Shoe Sizing: Learning how to measure shoe size with tape measure can be useful for online shoe shopping or custom footwear orders.
Troubleshooting Measurement Challenges
Even with practice, you may encounter tricky measurement situations. Here are some solutions:
Dealing with Odd Angles
- Use a carpenter’s square to create a right angle
- Measure from the square to your endpoint
- For very complex angles, consider using a digital angle finder in conjunction with your tape measures
Measuring in Tight Spaces
- Use a slim tape measure or a telescoping measuring rod
- Take multiple smaller measurements and add them together
- Use the width of the tape measure itself as a guide for very small spaces
Solo Measurements of Long Distances
- Use a laser distance measurer for very long distances
- Mark increments and measure in sections
- Use the “hook and walk” method: hook the tape and walk its length, marking each full extension
Measuring Overhead
- Use a self-retracting tape measure to reach high points
- Consider a telescoping measuring pole for safety and accuracy
- For very high measurements, a laser distance measurer can be invaluable
Using a Tape Measure for Body Measurements
A tape measure is an essential tool for taking precise body measurements. Its flexibility allows it to wrap around areas like the chest, waist, hips, and arms smoothly. Whether you’re tracking fitness progress, tailoring clothing, or conducting health assessments, a tape measure ensures accurate and consistent results with ease.
The Future of Measurement Tools
While the traditional tape measure remains a staple, new technologies are emerging:
- Laser measurement devices: Offer high precision over long distances, especially useful in construction and real estate
- Augmented reality measuring apps: Use smartphone cameras for quick estimates, great for home improvement planning
- Smart tape measures: Combine traditional functionality with digital features like Bluetooth connectivity and app integration
- 3D scanning technology: Allows for complex measurements and creation of digital models
However, the reliability and simplicity of a standard tape measure ensure its continued relevance in both DIY and professional settings. Many professionals use a combination of traditional and high-tech tools to ensure accuracy and efficiency.
While traditional tape measures remain popular, innovations continue to emerge. For example, machine extending measuring tape devices combine the familiarity of a tape measure with automated extension and retraction for easier use.
Conclusion: The Power of Precise Measurement
Mastering the art of reading a tape measure is a fundamental skill for any DIY enthusiast or professional. From understanding the difference between imperial measurements and metric measurements to avoiding common mistakes, this guide has equipped you with the knowledge to take accurate measurements in various situations.
Remember, practice makes perfect. The more you use your tape measure, whether it’s a standard model or a specialized type like a 3/16 tape measure or one with tape measure 16ths markings, the more comfortable and precise you’ll become. Whether you’re working on home improvements, crafting projects, or professional construction, the ability to measure accurately will save you time, money, and frustration.
Key takeaways:
Understand the components of your tape measure: Familiarize yourself with both imperial and metric systems. Practice reading fractional measurements: This includes tricky ones like 5/8 or 3/4. Use the right technique for inside and outside measurements. Maintain your tape measure for longevity and accuracy. Don’t hesitate to use specialized tools for complex measurements. Consider referring to a tape measurements chart for quick reference.
So grab your tape measure, start practicing, and unlock a world of precise measurements and successful projects! Remember, in the world of measurement, accuracy is not just about getting it right – it’s about bringing your visions to life with precision and confidence.
Whether you’re using a metal tape measure for durability, a mini tape measure for convenience, or a specialized fishing tape measure for your angling adventures, the principles remain the same. With practice and the right tools, you’ll be measuring like a pro in no time!

JJ Smith is the experienced blogger behind DIMENSIONS VISTA, turning everyday questions about item sizes and measurements into engaging, easy-to-understand content. With a passion for detail, He simplifies complex concepts and makes them relatable. Whether you’re curious about product specs or need practical insights, JJ’s posts offer approachable guidance to help you navigate the world of dimensions with ease.

